> For the complete documentation index, see [llms.txt](https://docs.material.security/llms.txt). Markdown versions of documentation pages are available by appending `.md` to page URLs; this page is available as [Markdown](https://docs.material.security/getting-started/deployment-guides/your-first-30-days/6-enable-email-remediation/configure-user-reporting.md).

# Configure User Reporting

Employee reporting is one of the most effective ways to detect and remediate phishing emails. Material places messages similar to each other in an issue, but how you respond to a user reported message is important. It gives you opportunity to reinforce this action, educate your users in addition to remediating in bulk rather than having to go one by one.

{% hint style="success" %}
We generally recommend enabling and configuring all methods of accepting user reports, using the steps below.
{% endhint %}

## Set up how you receive user reports

From Settings, expand **Email Threats** then click **User Reports**.

<figure><img src="/files/6T8QAiKez0vJWEhNJBiI" alt="" width="218"><figcaption></figcaption></figure>

Choose **at least one** of these options:

<details>

<summary>Forwarding Address</summary>

**Reporting**

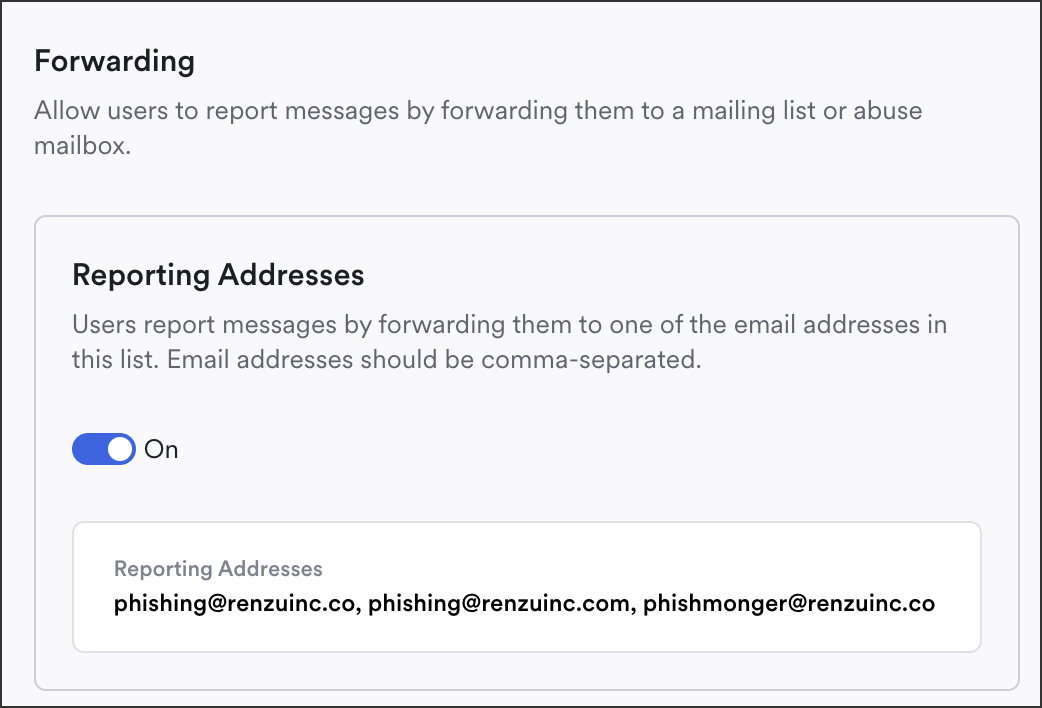
To streamline processing and support user awareness and training, include a specific email to forward user reported messages to. This is called a **Reporting Address**.

1. Toggle the option **on** to enable forwarding.
2. Enter all your forwarding email addresses in the **Reporting Addresses** field. Separate multiple addresses with commas, for example `email1, email2`
3. Click **Save**.

<figure><img src="/files/7f0qqxVWjJUsdfkmvjcv" alt="" width="375"><figcaption><p>Include a Forwarding Address</p></figcaption></figure>

{% hint style="success" %}
Include however many dedicated existing email addresses you have today for reporting phishing, however **don't include multipurpose mailboxes** here (e.g. where users contact your security team about issues that aren't phishing related).
{% endhint %}

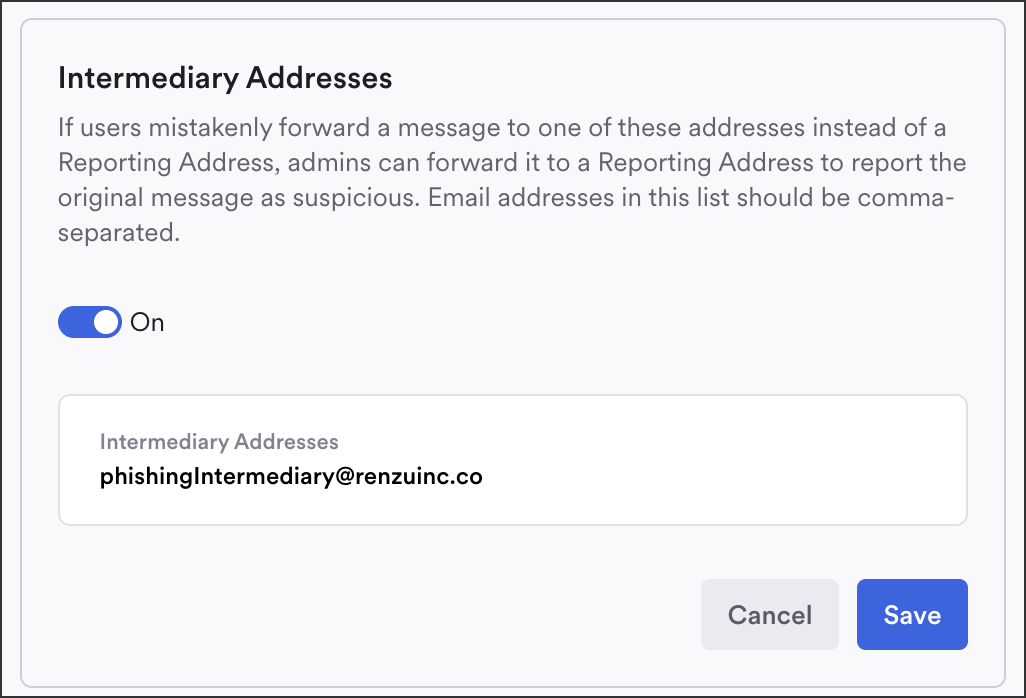
**Intermediary**

Sometimes reporting users forward emails to the wrong email by mistake. Include an **intermediary address** to ensure these emails get to the correct address.

{% hint style="success" %}
Intermediary addresses are only useful when there's an address (or set of addresses) where forwarded phishing reports are misdirected (e.g. if you have a phishing@ and security@ aliases and people accidentally send the reports to security@). Setting up an intermediary address ensures that Material doesn't treat security@ as the account reporting the message.
{% endhint %}

1. Toggle the **Intermediary Addresses** option on.
2. Enter all your forwarding email addresses in the **Intermediary Addresses** field. Separate multiple addresses with commas, for example `email1, email2` .
3. Click **Save**.

<figure><img src="/files/keN4DXcJrpfsuRO7dVW5" alt="" width="375"><figcaption><p>Intermediary Address</p></figcaption></figure>

</details>

<details>

<summary>Built-in Email Provider Labels</summary>

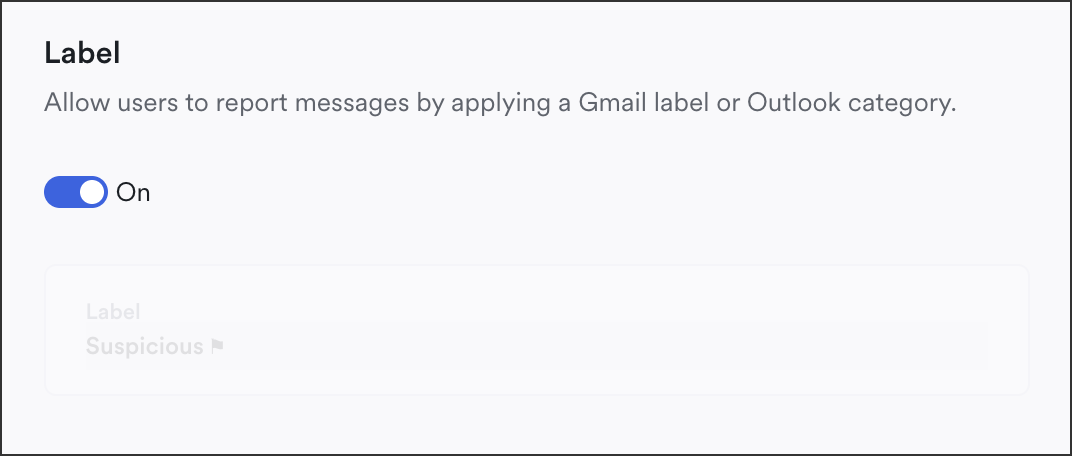
Make it even simpler for your users to report a suspicious message by allowing them to apply a Gmail label or Outlook category.

Toggle the Label option to **On**.

<figure><img src="/files/SEfwAa50SzIUzRiLOOBr" alt="Label setting" width="375"><figcaption><p>Email Threat Settings - User Reporting</p></figcaption></figure>

* Note, the label name is `Suspicious`, and that is not changeable.
* If a user applies the label and also forwards the email, only one issue is created or similar message added; we deduplicate repeated reports about the same message.

</details>

<details>

<summary>Email Provider UI (Google and Outlook Report Phishing Buttons)</summary>

Users can also click the built-in Gmail or Outlook "Report Phishing Buttons"

<figure><img src="/files/KX214LS8P7MxOFmYreSY" alt="" width="375"><figcaption></figcaption></figure>

**Outlook Requirement:**

To avoid issue creation delay when users click the "report phishing button" in Outlook:

1. Set up a [Reporting Address](https://docs.material.security/learn-more/risk-areas/email-threats/detect/user-reporting-methods#forwarding).
2. Once you have the Reporting address designated, as a Microsoft admin navigate to <https://security.microsoft.com/securitysettings/userSubmission> and update the settings to send to that reporting mailbox in addition to Microsoft:

   <img src="https://docs.material.security/~gitbook/image?url=https%3A%2F%2F3411262179-files.gitbook.io%2F%7E%2Ffiles%2Fv0%2Fb%2Fgitbook-x-prod.appspot.com%2Fo%2Fspaces%252FksjM8NywYRSHu1IlfxdP%252Fuploads%252FQpoTVA0LYRvC3uApTrIJ%252Fimage.png%3Falt%3Dmedia%26token%3Da5a36a86-22e8-424d-ae3d-727c9ab15be6&#x26;width=768&#x26;dpr=4&#x26;quality=100&#x26;sign=864b1e76&#x26;sv=2" alt="" width="375">

To learn more about Outlook phishing reporting, review [Outlook's guides.](https://learn.microsoft.com/en-us/defender-office-365/submissions-users-report-message-add-in-configure)

</details>

***

## Enable User Reporting Auto Classification

**User Report Auto Classification** automatically investigates and classifies user-reported emails so security teams can respond quickly and consistently. When a message is reported, the system checks trusted sources and analyzes 2,000+ signals to classify it as

* Malicious[^1]
* Spam[^2], or
* Safe[^3].

If a determination can't be made with a high degree of confidence, the issue will be marked as **Unknown** then surfaced to your security team on your Email Threats dashboard to [investigate](/learn-more/risk-areas/email-threats/investigate.md) and classify manually.

The [issue details](/learn-more/risk-areas/email-threats/investigate/issue-details.md) highlight the indicators used for classification. Hover over the indicators to see their descriptions:

<figure><img src="/files/kd6yczl4tHsCZ50amDgc" alt="" width="375"><figcaption><p>Hover the mouse over the indicators for a description</p></figcaption></figure>

#### Enable Auto Classification

We recommend you enable auto classification as part of your initial deployment to automatically accept classification recommendations and apply any response or remediation you pre-configured immediately.

1. As an admin log in to **Material**.
2. Click **Settings**.
3. From the left navigation, expand **Email Threats** then click **User Reporting**.
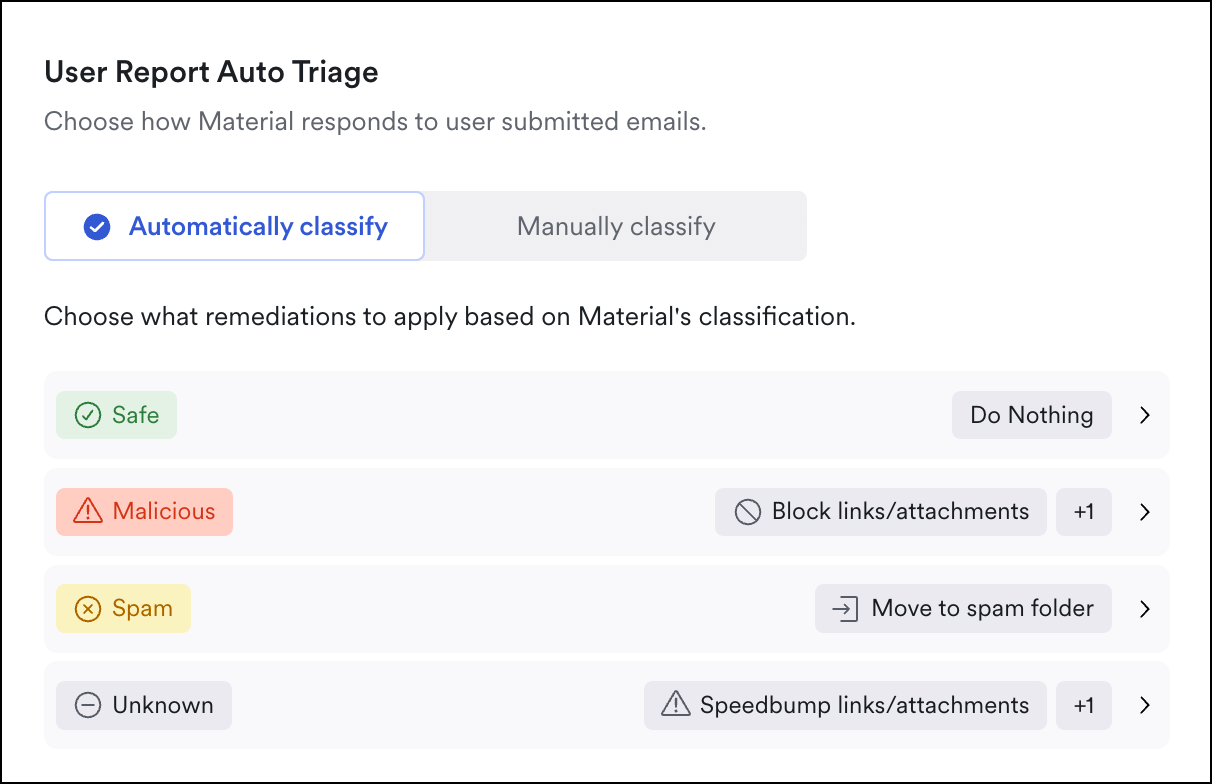
4. Scroll to **User Report Auto Triage**, then select **Automatically classify**:

<figure><img src="/files/OCkreB5tmfGImbGkmJqq" alt="" width="375"><figcaption></figcaption></figure>

5. For each classification type, choose from the auto-remediation options described [here](/learn-more/risk-areas/email-threats/auto-respond.md):

<figure><img src="/files/pHmmEYxWc1wDK6ZHZdti" alt="" width="375"><figcaption></figcaption></figure>

{% hint style="success" %}
Learn more about [User Report Auto Classification here.](/learn-more/risk-areas/email-threats/auto-respond/user-report-auto-classification.md)
{% endhint %}

***

## Auto Threat Hunt

If a user reports a message that Material classifies as anything other than safe, we'll create an issue and then go look for similar messages in the rest of the environment. We're matching on up to five attributes: sender, sender domain, message ID, subject, and/or link(s).

If another message (that is not already in an existing email threats/message issue) matches on any of those attributes, Material pulls it into the issue.

You can change which attributes we match on by default here, or on an issue by issue basis. If you de-select any attribute in an individual issue, it will also remove any messages that have been added to the issue based on that attribute. We recommend you the leave the defaults as is, and only update on an issue to issue basis.

Learn more about [Auto Threat Hunt here](/learn-more/risk-areas/email-threats/investigate/issue-details/detected-and-similar-messages.md#auto-threat-hunt-messages).

<figure><img src="https://docs.material.security/~gitbook/image?url=https%3A%2F%2F3411262179-files.gitbook.io%2F%7E%2Ffiles%2Fv0%2Fb%2Fgitbook-x-prod.appspot.com%2Fo%2Fspaces%252FksjM8NywYRSHu1IlfxdP%252Fuploads%252FraH6WLwbIxWc115lnwme%252Fimage.png%3Falt%3Dmedia%26token%3D198ab8b7-073b-4607-8a72-fa19cb64dea9&#x26;width=768&#x26;dpr=3&#x26;quality=100&#x26;sign=aebbfad0&#x26;sv=2" alt="" width="563"><figcaption></figcaption></figure>

***

## Reporter Acknowledgements

Sending a follow-up message ensures users are informed of actions taken, reinforces security awareness, and confirms that their report was valued. It also provides guidance on any additional steps they should take, fostering a proactive security culture and improving response to future incidents.

In the Reporter Acknowledgement settings, use templates to quickly and consistently respond. You can also use variables to further customize responses:

<figure><img src="/files/ZG9ZMB5r4ZBZO8rxPkjE" alt="email" width="563"><figcaption><p>Reporter Acknowledgement</p></figcaption></figure>

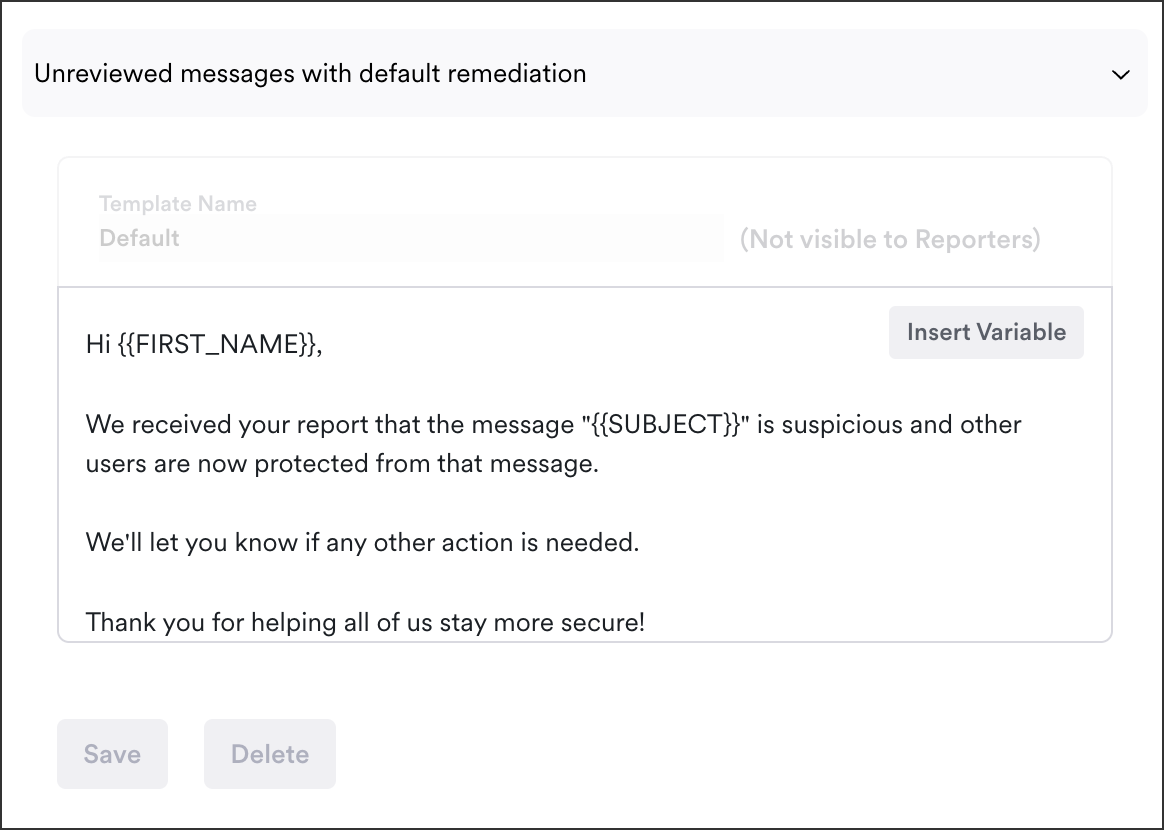
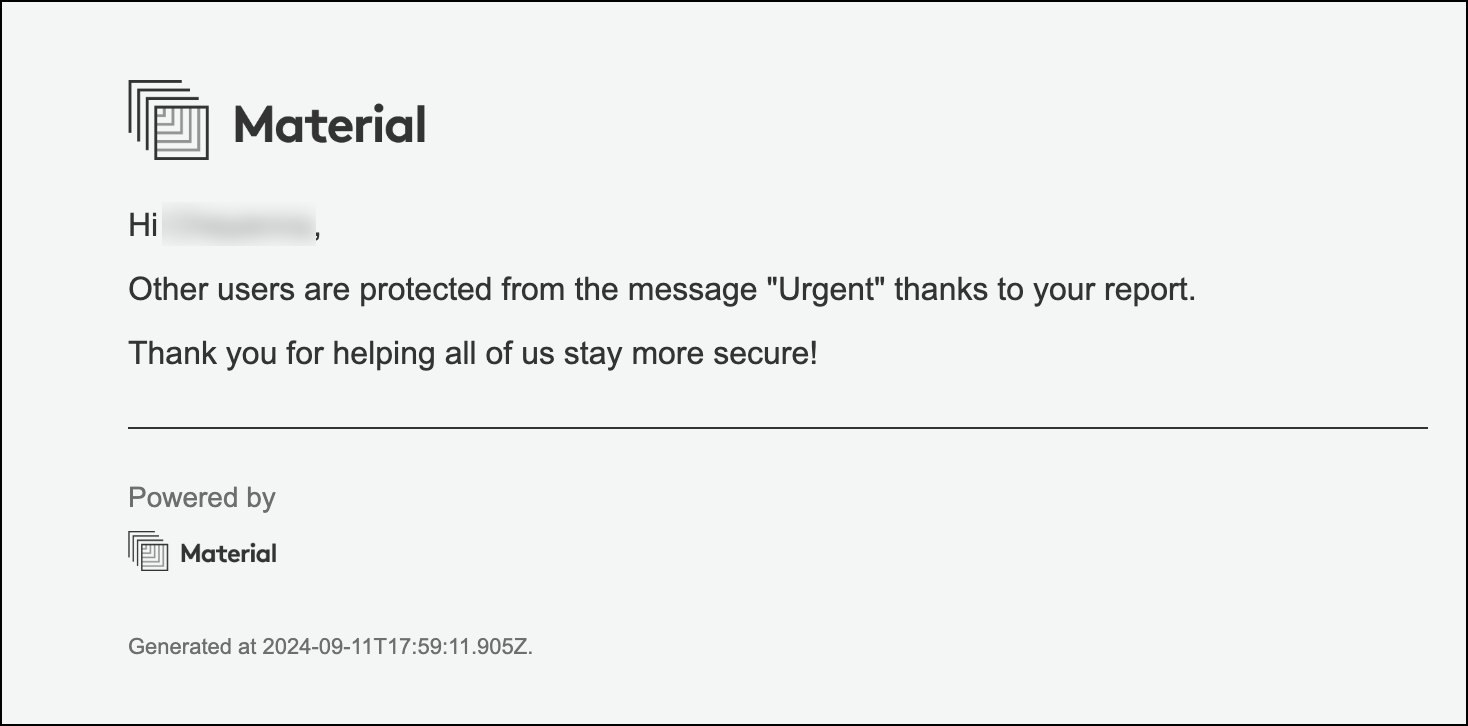
This is an example of a reporter acknowledgement, auto-sent in response to a user report:

<figure><img src="/files/pmHFzSDdFONDlotQPZgB" alt="" width="375"><figcaption><p>Reporter Acknowledgement</p></figcaption></figure>

### Acknowledgement Types

Different scenarios deserve different responses and follow ups, like a message that was reported and is safe vs. a message reported that is malicious. We include multiple templates so you can customize to these scenarios.

<figure><img src="/files/Unf1M81WH9vmpQ2k9Eem" alt="" width="375"><figcaption></figcaption></figure>

Reporters typically receive one of these templates:

* **Admin Classified**: One of these three templates for **Safe**, **Malicious**, **Spam** trigger depending on how **your team** classifies the issue.
* **Material Classified**: One of these three templates for **Safe**, **Malicious**, **Spam** trigger depending on how **Material** initially classifies the issue.

Reporters receive the **Initial user response** template if the issue is classified as unknown, or auto-classification is not enabled. Once the issue is classified, subsequent reporters receive one of the classified templates. If your team changes the classification, any reporters after that change receive the template that aligns with the updated classification.

If the message is an exempt message from a trusted entity, then your user receives the template for **Initial user report that matches a trusted entity**, not any of the other templates.

{% hint style="info" %}
Note, we'll review **Trusted Entities** at a later time. To briefly explain, sometimes you know and trust a sender and don't want issue creation to occur for these exceptions. You can add that sender to your [Trusted Entities](/getting-started/fundamentals/detect/trusted-entities.md) allowlist then choose how they are treated by Material via Trusted Entity settings.
{% endhint %}

#### Personalize your responses

We include some default language in each scenario to get you started and allow you to enable right away, but you can change the content as needed.

Insert variables to personalize your response even more:

<figure><img src="/files/JGEMBEde7nCxNvXLzC5V" alt="" width="135"><figcaption></figcaption></figure>

{% hint style="success" %}
Learn more tips in [banner & template best practices](/learn-more/risk-areas/email-threats/auto-respond/banner-custom-message-and-template-best-practices.md).
{% endhint %}

### Save a new template

To save templates for re-use in other settings:

1. Expand any response type except **Initial user report** or **Initial user report that matches a trusted entity**.
2. Click **New Template**.
3. Name your template, update the content, then **Save.**

Saved templates appear in a drop down above the response type. You set any as you active default response.

<figure><img src="/files/43tl9v8z1S1cC1ZXCglw" alt="" width="214"><figcaption></figcaption></figure>

### Enable Email Reporter Acknowledgements

Once you've made any revisions to the existing templates that you need, enable reporter acknowledgements so they can begin triggering. Toggle the option on:

<figure><img src="/files/a8YAf6riTBONLITyIF3A" alt="" width="375"><figcaption></figcaption></figure>

{% hint style="danger" %}
Enabling Email Reporter Acknowledgements does **not** enabled remediation as a whole.

After you finish configuring Email Provider Alerts and Issue Triage in the next guides, **finish Email Security deployment** by enabling remediation itself.
{% endhint %}

#### Send Reporter Acknowledgements via other services

We recommend enabling Reporter Acknowledgements via email at deployment. If you prefer to send them via Slack, Teams, or other messaging services, disable this setting and set up a webhook instead.

[^1]: emails identified as harmful, containing threats such as malware, phishing attempts, or links to fraudulent websites

[^2]: unsolicited, often irrelevant emails sent in bulk, typically for advertising purposes, which can clutter inboxes but aren't necessarily harmful

[^3]: emails deemed free of threats, containing no malicious content or links, and posing no risk to the recipient's security


---

# Agent Instructions
This documentation is published with GitBook. GitBook is the documentation platform designed so that both humans and AI agents can read, navigate, and reason over technical content effectively. Learn more at gitbook.com.

## Querying This Documentation
If you need additional information that is not directly available in this page, you can query the documentation dynamically by asking a question.

Perform an HTTP GET request on the current page URL with the `ask` query parameter, and the optional `goal` query parameter:

```
GET https://docs.material.security/getting-started/deployment-guides/your-first-30-days/6-enable-email-remediation/configure-user-reporting.md?ask=<question>&goal=<endgoal>
```

`ask` is the immediate question: it should be specific, self-contained, and written in natural language.
`goal` is optional and describes the broader end goal you are ultimately trying to accomplish on behalf of the user. GitBook uses it to tailor the answer towards what is most useful for that goal.

The response will contain a direct answer to the question and relevant excerpts and sources from the documentation.

Use this mechanism when the answer is not explicitly present in the current page, you need clarification or additional context, or you want to retrieve related documentation sections.